Showing posts with label ADC Motor. Show all posts

Thursday, October 15, 2009

How I Used an Automatic Transmission in an EV

I have been lots of questions on how exactly I used the automatic transmission in my EV. So this insanely long post is a summary of how I did the whole transmission setup.


The first thing I did was design a motor coupling and plates that mimicked the old ICE. I kept the torque converter and flywheel setup, and since it mimics the original engine, the adapter plates and motor coupling can be used with the automatic or a manual transmission. I used the transmission's Flex Plate to design the motor coupler, which is a taper locking coupling. The aluminum plates were created using a second transmission I bought off Craiglist because at the time the car was still driving and I wanted to have as little down time as possible, so I bought the second transmission (which was skipping gears) as a EV sacrifice so I could use it as a template for the coupling and for the bolt hole pattern on the plates.Next, I left the Automatic transmission installed with the existing radiator/transmission cooler. I also left the PCM and ECU installed as they are needed to operate the transmission and the dash board. I also used the old engine mount to hold up the rear side of the 9" ADC FB1-4001A series wound motor. The motor has a rear shaft that will connect to the Power Steering pump and A/C compressor.
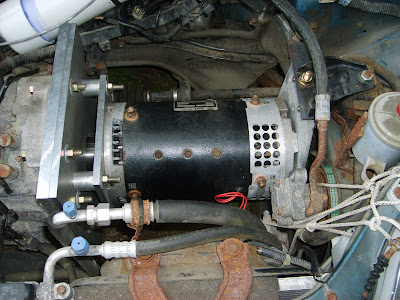
After all the mechanical is done, comes "fooling" the PCM. I Do not idle the motor at all. It does take about 6 seconds to build up pressure for the clutches to operate, but that only happens when the EV is first started before a trip. During driving the pressure stays up while at stop lights and such, and getting going again is no slower than with using a manual with a clutch.

Now comes the big question: How did I change the shift points on the transmission? Did I reprogram the PCM? Modify the transmission soleniods? I did nothing of the sort! The key to using to changing the shift points: replace the TPS with a 5 k potentiometer!

In and ICE he TPS tells the transmission when to shift, depending on how hard the pedal is pressed, when accelerating or cruising or coasting. By replacing the TPS with a 5K potentiometer I now can manually tell the PCM when to shift. The higher I set it, the longer it stays in each gear. After 1,000 miles of driving like this, I have had no problems and I have found a few settings that work well depending on which terrain I drive on. Higher RPMS mean better efficiency while lower RPMS allow for better acceleration.

I usually leave it at about 1/4 turn, however it needs to be set to 0 every time I start up the EV because if the TPS (5k pot) is higher than 0, the transmission thinks you are stepping on the gas and will lock the Shifter into place so you cant move it from Park. Annoying, but effective safety measure. And I will not be bypassing that protocol, but if I do the transmission can easily be shifted into Neutral with the EV off, and that is a safety issue that is checked during the yearly Inspection.

Sunday, June 14, 2009

Assembly Day Two

I woke up this morning to torrential rains, which was not on the forecast on Friday. So, after breakfast, I setup my tarp and went to work on installing the control tray. After about 3 hours of bolting, cable installation, checking again and again, it was done!

It wasn't without some little quirks, though. I first tested the control tray and started to smoke up my Precharger Resistor because my DC/DC was connected on the wrong side of it. I just unplugged the DC/DC until I can lengthen the wire for the positive side tomorrow.

After, I fired everything up, got in the EV and went to drive, and the Transmission wouldn't come out of park! It turns out that I had parked it funny, so I had to use the key to override the lock out, rolled down the driveway a few feet, and it was fine.

Then I went for a 1 mile jaunt around the neighborhood, and the EV had much more power now than before, with driving up to 25 MPH. I did feel like it should have had more power, but I decided to skip the step of checking the Kelly Controller settings before my little trip. After I got back, I hooked my laptop and found out that I had the wrong settings on the controller! I changed the settings and tomorrow I will go out to test them.

Now I do have a few things to work on. The vacuum has a leak in it, and my TPS sensor fell out when I installed my control tray, so I will have to reinstall that. I also have to go on a few small trips to break the brushes and batteries in again, so maybe 2 or 3 small trips this week will do that.

Once I get the little quirks out, I will make a video of the EV in action. I need about 30 minutes to fix up the little things, then I should be good for a real joy ride.

My next goal is to install the charger into the trunk. Right now it is an external setup, but I will change that and install the K&W BC-20 into the trunk so I can charge it in any weather. Then I will work on the Power Steering and the Air Conditioning, but that's later on.

Tuesday, June 2, 2009

Adapter Plates, 2.0

It turns out that the machine shop just doesn't have the time to work on my plates. So today I went down and picked up my FB1-4001A, sacrificial transmission and the new plate stock. I then went off to Home Depot and picked up a new 15" Drill Press, new bits and new DeWalt batteries then spent the day setting up the equipment.


The drill press seemed more complicated than the EV! After setting up, I went straight to work. It goes so much faster now that I have the old plates to use for patterns, and all the right equipment does wonders. I only spent about 30 minutes actually making the plates today, but I will be working on them for the next few nights with the *hope* that I can install it this Saturday. I am also taking my time and making these new plates as professional looking as possible, vs my other "hacked up" plates, which did look pretty bad up close, although they worked perfectly.

Saturday, January 31, 2009

The Plan, Civic EV 2.0

I am developing a plan for installing the newly acquired EV parts. For the time being, I am going to continue to use the motor I have and get that blower installed, which I now have all the parts for. I have done some range tests, and will do some more to gather data.

My plan is to install the new motor, but in order to do that I need new adapter plates and motor mounts. I am going to put the motor on the bench and clean it up, adjust the brush timing and get the commutator cleaned up. It has been sitting for 7 years, but spins up just fine. This is the list of things I want to do:
  • Remove Transmission and have new plates made for the FB1-4001A
  • Upgrade to a stiffer Coilover system
  • Rewire EV with the better 2/0 gauge cable and proper lugs
  • Mount PakTrakr and AMP meter to dash
  • Build metal frame for the battery racks
  • Rebuild front control tray
  • Setup K&W BC-20 Charger
This is pretty much Civic EV 2.0 because of all the upgrades/changes.

I am saving up the money required for the new plates, and hope to have the new Coilovers ordered soon. My plan is to get the motor/transmission to the machine shop, and while they work on it I will work on the rest of the EV. My time is limited due to classes, and I spent two weeks on the plates before, probably 40+ hours of cutting work, and just don't have the time. Everything else is small, probably a weekend's woth of work and a few people already have shown an interest in helping out.

Monday, September 8, 2008

The Motor is In!


It took most of the afternoon, but the motor is finally in! Everything appears to be aligned and I can spin the motor, so I think it is looking good. I have also bought 2 more batteries and hope to do a quick test spin up this afternoon after classes.
The motor looks so small in the compartment, but it should be able to move the car around since it's a 10 HP continuous motor and I don't plan on taking it past 55 at all. (30-45 MPH is the desired speed)


So here is what I have left:

-Paint rear battery rack and install it

-Design and build motor mount for extra strength

-Design and build front battery rack

-Wire everything up


I am really hoping for a short street test this week, up and down the road on the 36 volts I have.