Well, the plate went to the shops today to get the bolts counter-sunk which should eliminate the ticking. It may actually be down, but I haven't been home yet to find out.
I have found a nice water proof box that I will use and install the contactors, low voltage control system, fuses and precharge resistor in. My goal is that the only exposed electrical system will be this control box and the Kelly Controller. I will get a decent heatsink for the controller and have it mounted securely and make a clear casing for it out of plexiglass so you can see if, but the elements stay away from it.
I also recieved my vacuum pump! I now have to make a vacuum tank, get a pressure switch and some tubing. It was somewhat difficult to use the brakes without the power assist, and with the extra weight of the battery pack, it is a must.
Tuesday, October 28, 2008
Sunday, October 26, 2008
Once Upon A Time...
There was a cranky powertrain control module. It refused to shift, function or even tell the ones around it why it's so cranky. After many hours of being poked, prodded, checked, yelled at and so nearly beaten, someone had the bright idea of looking up "Cranky PCMs" in the Big Book of Errors and found that the PCM needed to be grounded, indefinitely. Once the PCM was ground, it came out and told everyone why it was so cranky, and then things went back to normal.
Ok, done with story telling, back to reality.
After spending most of Saturday trying to figure out why the car wouldn't engage into gear, I had the bright idea of going down to AutoZone and getting a OBDII Scanner to check the car's computer. BTW, the scanner costs $152, but it is considered a rentable item, so you get your money back when you return it. (Making AutoZone the most epic car parts store around)
So I get back and plug this into the car to get some readings, and it said it couldn't find the ECU/PCM. Just peachy.
I found out that I never replaced a fuse I took out back in July (For the Fuel Pump) was also the main fuse for the ECU/PCM. Once that weas replaced, I was welcomes with ticking sounds from the PCM and blinking dash board. After another hour of going through the manual, I found that the wire labled "Engine Ground" is actually the ground for the PCM, so I needed to ground it. All was happy and no more blinking dash and I was able to get some error codes. This also fixed the shifter not letting me move out of Park without using the override key. Now it works just fine.
They say a picture is worth a thousand words. Then this picture is worth 3,720,000 words!
Yes it moves! Ok, you will hear a few noises. One noised is a ticking that is from the motor coupler that I haven't fixed yet, and the other was a quick grinding sound, which is entirely my fault because I am used to driving a stick and not an Automatic. I pushed the shifter forward to go into neutral like I would in my car, but the Park is forward and neutral is pushing the shifter down! AAHH!
The initial tests seems rather underpowered, but I believe that was because of the settings I used on the controller. I was using a 60 volt pack, but I have the Low Voltage setting to 56 volts. The pack will sag under load, and it probably sagged past the 56 volts and then the controller kicked in the current limting. It really should be around 52 volts. I have had the controller limited to 75% output, but I will reprogram it when I reinstall everything.
Wednesday the Vacuum Pump should arrive and I am glad because those brakes needed A LOT of forced to slow the car down. This afternoon I am removing the motor again to get the bolts countersunk and to clean up a bit. So many things left to do - make a control box, front battery rack, bolt down rear battery rack, make new cables, create vacuum setup, and setup the charging system.
Thursday, October 23, 2008
The Ticking is Back
I finally got the control board back in and did a another test spin on the jacks. It was great for 5 minutes, and then the stupid ticking came back. AAHHHHH!!
I called it quits for the day and went back to my school work. This weekend I will take everything apart again (I will have this motor decoupling down to an art soon) and on Monday try to get the holes on the motor plate countersunk. The torque converter bolts and one of the motor bolts is a heck of a lot closer than I originally thought, so even with a slight pressure the bolts hit each other.
I may try a test drive up and down the drive way again and record it to have something to post, and to show off the annoying ticking sound. That and I want to test out the drive train to make sure it actually works and hope I don't have to solve more problems.
Monday, October 20, 2008
Vacuum Pump
I am still putting the motor back into the car, but I also ordered a Thomas Vacuum pump for the brakes. I found one on eBay for a steal at $98, so I bought it and hopefully it will be here end of the week. I will make up a vacuum chamber and get a vacuum switch so it's not running all the time. The pump only draws 4 amps, so it's a real minimal load, and runs on the 12 volt system so won't impact my traction pack.
This afternoon I am putting the motor back in. It's already lined up hanging on rope, but I was busy cleaning up the compartment and went off to visit relatives.
This afternoon I am putting the motor back in. It's already lined up hanging on rope, but I was busy cleaning up the compartment and went off to visit relatives.
Saturday, October 18, 2008
Another Look

Today I tried to contact the machine shop, but they were closed for the weekend. So I decided to take another look and my coupling and see what needs to be done.
The problem was that there was a ticking sound coming from the adapter system. That turned out to be the bolts from the torque converter and the motor skimming off each other. And that occured because the coupling was slightly loose and pushing back when the torque converter was pumping and forced back.
My dad and I came to the conclusion that the coupling was not gripping the shaft like it should have. Well after a few hours of looking over everything, I went to put the coupling back on the motor and realized what was really wrong!
When I first recieved the coupling, I pressed the support pins in and bolted it together and then placced it onto the shaft. When I did this, I didn't actually get the taper piece in all the way and there was enough give to allow it to slide up and down the motor shaft. When I went to place it back on the shaft, I had used a wrench to tighten the bolts and it pressed in all the way. So it wouldn't go onto the motor shaft because it was tightened! Then when I loosened the bolts, it slipped on like it did the first time I installed it! So this was a user error and not a machining error. Which is good, because I spent months getting that design right and a total of $600 for the whole adapter system.
Friday, October 17, 2008
Damage Report- Or Lack of It
I finally got the motor out and I found nothing wrong with the coupler. It was just the way I installed it, no broken key no slipping metal or busted components. The ticking was what I originally thought, the bolts of the torque converter and the motor bolts hitting each other.
I will call up the machine shop tomorrow to see if I can get the coupler adjusted so it grips the shaft better and to get a few holes counter-sunk so the bolts won't hit each other.
So here is my problem. My transmission won't engage into gear and I have to figure out why. It's the curst of the Automatic transmission, but I can't put in a stick so I need to figure out how to fool the PCM to function. I am searching online for any information of the Auto not engaging, and I think it won't because of a throttle position sensor missing.
Wednesday, October 15, 2008
And We're Walking.....
50 points to the first person who figures out what the qoute is from. And here is the relevance to the qoute:
I figured out what the ticking sound is, for the most part. It's my coupler. I think the key broke and because the tapered coupling didn't hold the shaft tight enough. I found this out when I drove the car down the drive, and when to drive back up and it wouldn't go forward. I could feel the car going, and then slip and that's when the ticking sound appeared. My driveway is on a very slight incline, but enough that I needed three people to push the car back up.
Now I have to remove the motor and adapter to check the coupling. I have removed the board that housed the controller and high power electrical components and either Thursday or Friday I will remove the motor and figure out what to do. I will most likely bring it back to the machine shop to fix it and my dad will be coming along since he is the mechanical engineer and make sure that the taper will be tight.
Tuesday, October 14, 2008
Wish List
I am putting together a wish list of tools or parts that I either want or need over the next few months.
As it stands right now, I really can't complete my PIC controller without an oscilliscope. I have found one I like on eBay for $325, so that is at the top of my list, right next to vacuum assist When doing my trial I found the brakes a little hard, but I haven't really tried them out yet on the road. I do know that I need to install the vacuum assist if anyone else in the famly is going to drive it. I am searching onlie for decent deals of the 12 volt vacuum pump, but I am also going to find out what cars used them and check out the local junk yards. Then I want some backlit large LCD display volt meters, which seem to go for $11 on eBay. I have also found schematics for making my own pack monitoring device that I am going to try and build eventually.
So instead of boring everyone with the story behind the rest of the items, here is the list:
-Oscilloscope
-Vacuum Assist Pump
-Volt Meters
-Homemade Pack Monitor
-Small solar panel for AUX battery charging
-PicKit2 USB Programmer so I can use the high end 16MHz PICs for my controller
The First Run!
Last night I got in my first little test run! I just went up and down the driveway because it was rather dark out, but it works! There is a minor problem that I have to work on. There is a ticking sound coming from the motor adapter, and I believe it to be where the Torque Converter bolts hit the motor bolts. There was a little more than a 1/8 inch gap and it must have slipped back and now hits a little. Later this week I will dismantle the electrical system and fix up the adapter plates. I want to try a quick fix before I dismantle everything, and I will take a video to post.
Monday, October 13, 2008
Launch Prep

I have everything installed and I am ready to test this thing out! No, the car's not done, but I have enough strapped down and plugged in to try a 60 volt test again! I have to wait until someone else is home for safety reasons, but I went over the wiring about 20 times, tested the low voltage setup, got the Kelly Controller programmed and I am topping off the batteries before the first run.
This is the Kelly Controls KHD09401 almost installed and on a scrap piece of aluminum. It's not the best solution, but should suffice for a trip down the street. I am going to get a proper heatsink before I attempt any real road rage.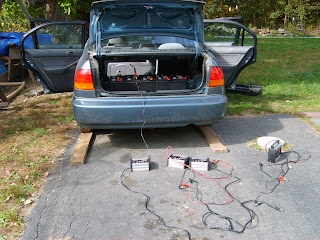

And this picture is of the batteries and their top off charge before the run. I measured all the voltages and they were pretty close except for battery #2, and it was 0.7 volts lower than the rest. The other batteries finished their top off charge in 30 minutes, but this battery is still going and it's almost been an hour and the charger says its 25% complete. So this battery is either my weakest link, or it hasn't been charged, and I actually don't remember actually fully charging this one battery EVER. It's only a month old, and has an August date on it.
Saturday, October 11, 2008
Unexpected Surprises!
There are unexpected events and there are surprises. Then there are things that are unexpected surprises. Today was one of those days filled with unexpected surprises.
My plan for the day was to reorganize the hood and create battery trays. Instead I got a call from my old Audio Visual teacher from High School and spent the day in the high school's auditorium setting up for the school's fall play. I hadn't done any AV work since I graduated in 2007, so it was like old times. Usually the AV students hang the lights, focus and setup the stage, sound systems and set, but this time all the upper classman were not around and I was called in to help teach the new freshman and to get things going since they were a day behind. It was actually quite good (and free food!) so I didn't feel bad about not working on the EV.
And when I got home, I found my controller sitting there on the table! Not only was it here a week earlier than expected, it was the next model up than what I had ordered! So I now have the Kelly Controls 24-96 Volt 400 AMP with REGEN, worth about $200 more than what I paid. I had about 30 minutes of "Oh crap will this even work" and then I found on the EV Album that a few people have used the regen models on their series wound motor to no ill effect. Except regen doesn't work. I am perfectly fine with this since this is only a temporary controller until my PIC controller is done.
Now I have changed my plans for the rest of the weekend. I am now going to rewire the car and setup the Kelly Controller and try out a 60 volt test run. I hope to try it out tomorrow since it should take too long to reinstall my temporary chunk of plywood and control circuits. Once I have done a test run (or attempted it) I will go back to finish my battery racks. I know I am jumping around a lot, but I really want to see this thing move! (And so does my family and half the neighborhood!)
Tray Troubles

These are my template trays in the front compartment. There is a lot of clutter in the front and that is making the trays hard to implement.
So for this weekend my goal is to rearrange the wiring and try to make the battery rack as simple as possible. I am going to pull out the 12 volt aux battery, cut out that last gas line and adjust the trays some more.
Tuesday, October 7, 2008
Battery Trays
I have almost completed the template for the front battery trays. I have to buy the real materials, but I will post a picture once I have finished making the mounts that hold the trays to the sides of the engine compartment.
The engine compartment isn't organized too great. I can only get three batteries in the front, which is all I need. I was hoping to get four in, but the batteries were too large and the brake lines, motor adapter and transmission got in the way.When I post the picture tomorrow you can see the crazy battery setup I have. And in order to get the three batteries in the front, I might have to change the location of the 12 volt aux battery.
The engine compartment isn't organized too great. I can only get three batteries in the front, which is all I need. I was hoping to get four in, but the batteries were too large and the brake lines, motor adapter and transmission got in the way.When I post the picture tomorrow you can see the crazy battery setup I have. And in order to get the three batteries in the front, I might have to change the location of the 12 volt aux battery.
Thursday, October 2, 2008
Controller Purchased!
I finally ordered up the controller! Instead of trying to get the bank/debit this sorted out (which they couldn't do anyways...) I used PayPal to purchase the controller. So now I just need to wait for it!
I started to plan out my front battery tray this afternoon. I have to clean up the engine compartment more, rearrange the wire harness and motor cables. It's going to be a tight fit, but I found a picture of another 95 Civic with 5 group 31 deep cycles batteries in the front, so it is definately possible. My card board battery model is taller than the real battery, so that is throwing my off a bit.
This weekend I am going to a family yard sale to sell off old stuff in the name of my EV. Hopefully I will make a few bucks to start paying back the cost of the controller. Then I will be getting to work modeling the front battery rack.
Small Snag
I finally get enough money to order the controller (from family donations) and I find out my freaking debit has a limit and the controller price is $15 over it because of shipping. So I head on down to the bank to get it lifted. I fill out the forms, sign away my soul and then I am told it might not be implemented until Saturday. And I wanted to order it today. Just peachy.
So while I wait for the forms to go through, I am going to get to work on the front battery rack. My dad found some old L metal peices I can use to create the template for the front rack. I am going to try and get 4 batteries in the front, but three will suffice. If I can get 4, I will replace the small car battery with another deep cycle.
So while I wait for the forms to go through, I am going to get to work on the front battery rack. My dad found some old L metal peices I can use to create the template for the front rack. I am going to try and get 4 batteries in the front, but three will suffice. If I can get 4, I will replace the small car battery with another deep cycle.
Subscribe to:
Posts (Atom)